




 Nederlands
 Italiano
 Português
 Română
 Español
 Ελληνικά
 Polski
 Türkçe





You open Settings, see the little banner pushing you toward Windows 11, and have no clue whether your PC is even eligible. Microsoft didn’t just raise the specs slightly with this release, it introduced a couple of requirements that trip up even people who know their way around a computer, and the official explanations have never done a great job clearing things up.
So how do you actually find out if your PC qualifies? Two minutes and you’ll have a straight answer.
Start with Microsoft’s own tool
The fastest route is the PC Health Check app, which Microsoft built specifically for this. Download it from Microsoft’s site, install it, open it, and click “Check now” under the Windows 11 heading. It gives you a straight yes or no, and when the answer is no, it names the exact requirement holding you back rather than leaving you guessing.
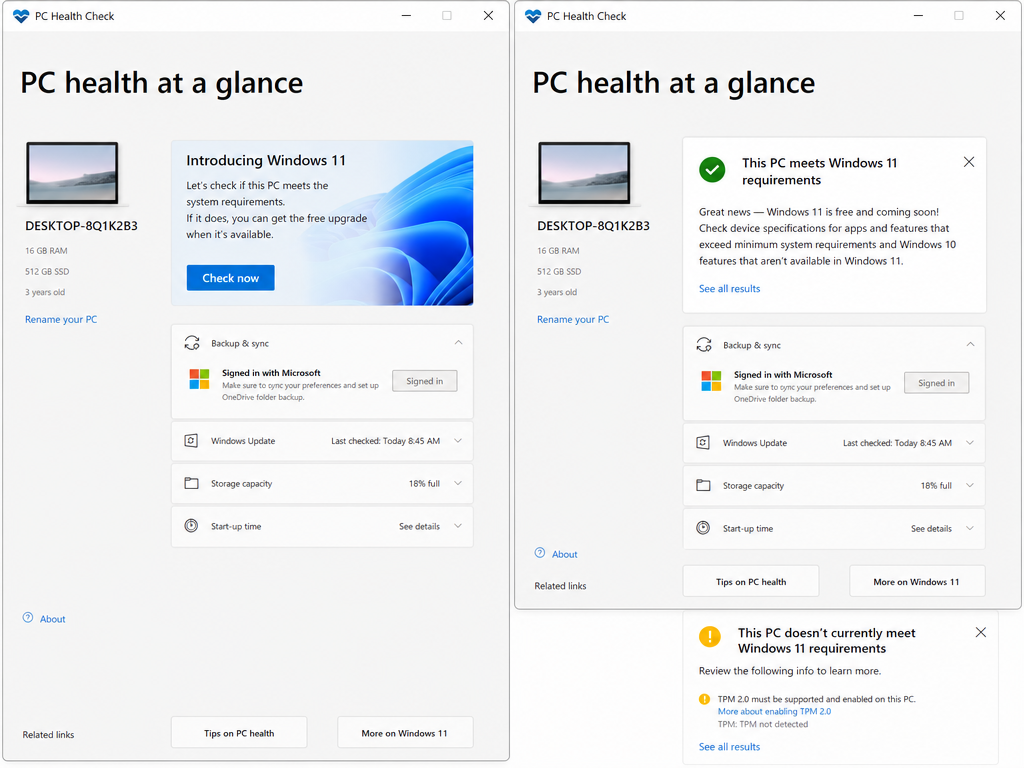
That’s genuinely all most people need to answer the “can my PC run Windows 11” question. If you get a green light, you can go straight to browsing Windows 11 licenses and skip the rest of this. But the tool has a habit of throwing around terms like TPM without explaining what they mean, so if you got a “no” and want to understand why, keep going.
What Windows 11 is actually checking for
Here’s the full list Microsoft uses to decide whether your device qualifies. Worth reading through once so you know exactly what each flag means if PC Health Check throws one at you.
- Processor: A 64-bit chip with at least 1 GHz and two or more cores. In practice this means Intel 8th generation or newer, or AMD Ryzen 2000 series or newer.
- RAM: 4 GB is the stated minimum, though 8 GB is a more realistic number if you want the computer to actually feel responsive.
- Storage: 64 GB of free space or more.
- System firmware: UEFI, with Secure Boot capability.
- TPM: Trusted Platform Module version 2.0.
- Graphics: DirectX 12 compatible, with a WDDM 2.0 driver.
- Display: 9 inches or larger, at least 720p resolution.
- Internet connection: Needed to complete setup on Windows 11 Home, along with a Microsoft account.
If your machine was bought in the last four or five years, there’s a decent chance it sails through this whole list without a hitch. Worth noting the requirements are identical whether you’re eyeing Home or Pro, so compatibility isn’t a factor in that decision at all. If you’re still weighing up which edition to actually buy, this Home vs Pro guide breaks down what genuinely differs. The two requirements that actually stop people are TPM 2.0 and processor generation, so those deserve their own explanation.
TPM 2.0, the requirement that confused everyone at launch
TPM stands for Trusted Platform Module, a small chip on the motherboard that handles encryption keys and other security functions behind the scenes. Here’s the part that surprises most people: a huge number of PCs built since around 2016 already have a TPM 2.0 chip sitting inside them. It’s just switched off in the BIOS by default, so PC Health Check reads it as missing when really it’s just asleep.
Turning it on usually takes a few minutes:
- Restart the PC and enter BIOS or UEFI settings. This is usually done by pressing F2, F10, Delete, or Esc right as the machine starts up, though the exact key depends on the manufacturer.
- Look for a setting labeled TPM, PTT (Intel Platform Trust Technology), or fTPM (AMD’s version).
- Switch it to Enabled.
- Save and restart.
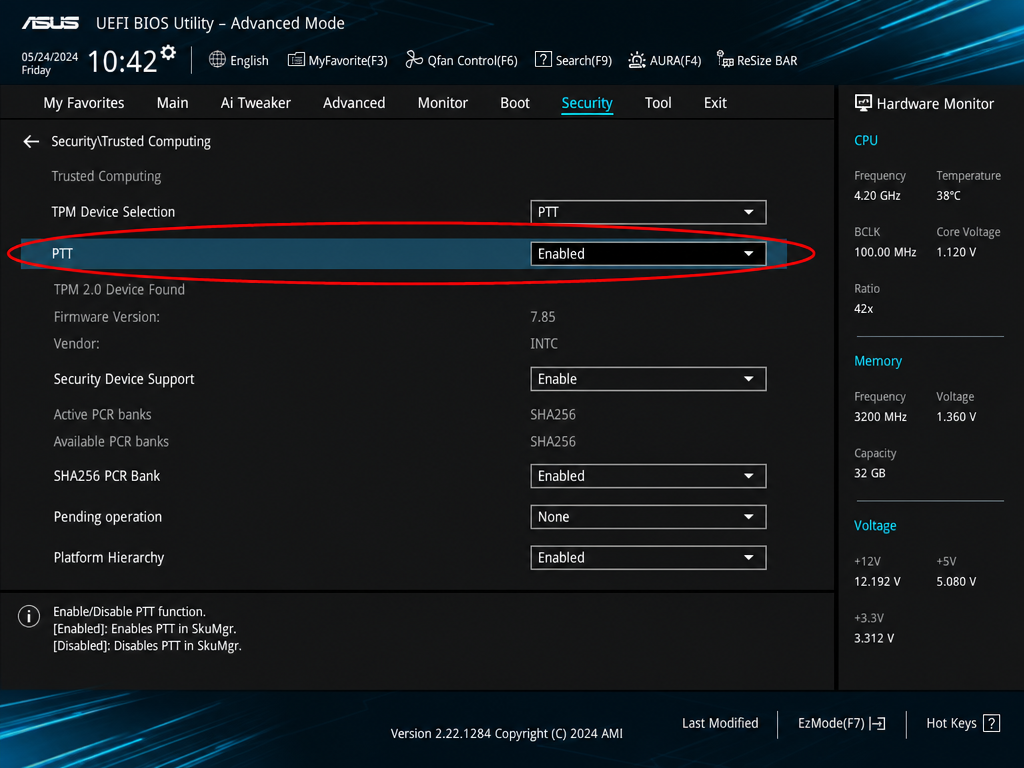
If you go digging and there’s genuinely nothing TPM-related in there at all, that usually means the motherboard itself doesn’t support it, and no amount of clicking around will fix that.
Processor generation is the harder wall to hit
This one has no workaround inside Windows itself. Microsoft keeps an approved list of supported processors, and if your chip isn’t on it, PC Health Check will flag it as incompatible even if the processor still performs perfectly well day to day. It’s a strange feeling to have a computer that runs everything you throw at it get rejected purely because of when the chip was manufactured, and it’s frustrated more than a few owners of otherwise solid 6th or 7th generation Intel machines.
Unofficial methods exist to force Windows 11 onto unsupported hardware, but Microsoft is upfront that it won’t guarantee updates or support for machines running outside the official list. That might be an acceptable risk for a spare laptop you’re experimenting on. It’s not something worth doing on the computer you actually rely on every day. If that describes your situation and a hardware upgrade isn’t on the table right now, a genuine Windows 10 license is still a legitimate way to keep the machine properly licensed while you plan your next move.
If your current PC doesn’t qualify
A few realistic options open up here, depending on what’s actually blocking you.
If it’s just TPM sitting disabled, enabling it in BIOS is usually the whole fix, and you’re done in five minutes. If it’s the processor generation itself, that’s a hardware ceiling rather than a settings problem, and it’s worth treating it as a sign the machine is closer to the end of its useful life anyway rather than something to keep fighting.
At that point, the simplest path forward is picking up a fresh license and doing a clean install on new hardware, or moving straight to a new machine if the old one’s on its way out for other reasons too. Keyfy carries both Windows 11 Home for everyday personal use and Windows 11 Pro if you need things like BitLocker encryption or Remote Desktop.
Either way, running the check now beats finding out the hard way later. Two minutes with PC Health Check tells you exactly where you stand, and from there the next step is obvious instead of guesswork.